The Solsta Runner Plugin for TeamCity adds various runner types that use the Solid State Networks console tools and Manifest API service to manage your Solsta build ecosystem, deploy releases, configure launch parameters and more. Deploying consists of converting and uploading raw files (assets) to a bucket or CDN in order to make releases available for download by Solsta desktop clients.
Article updated September 25th, 2023 for Solsta TeamCity Runner Plugin version 1.41 or later.
Agent Requirements
In order for TeamCity Agent to execute a runner from this plugin, it must have the following components installed:
- .NET 6.0 – support for .NET 8 is coming soon
- Linux-based runners require GLIBC 2.35 or greater
Installation
Within your TeamCity server, use the instructions from Installing Additional Plugins to install the Solsta Runner plugin.
Updating the Plugin
If you are updating the plugin from a previous version, we recommend uninstalling the existing plugin first. Uninstalling a plugin will not permanently remove its steps from any of your existing projects. Restart your TeamCity server after the uninstall (the web UI will prompt you to do this as well).
After the restart, upload the latest Solsta Runner Plugin for TeamCity .zip file, then enable the plugin as you had done during the initial installation. Next, wait for the server to push the latest version of the plugin to your agents. Your agents may be listed under the disconnected section and show “Agent has unregistered (will upgrade)” as a status:
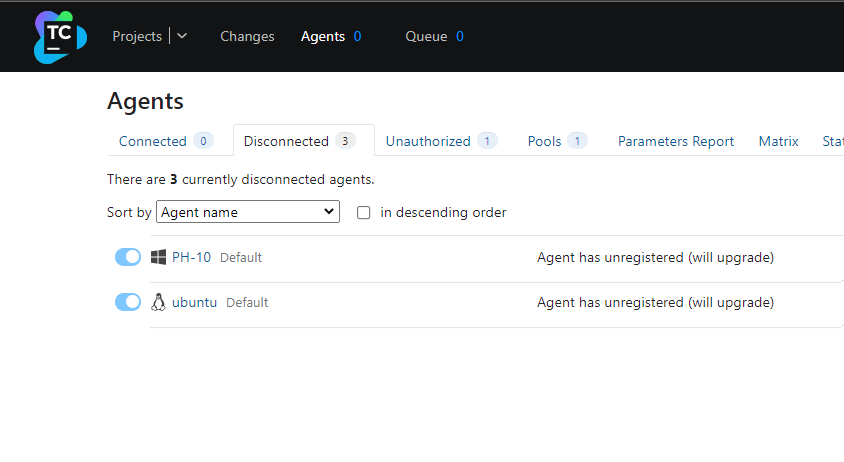
TeamCity recommends waiting up to 10 minutes for agents to be updated. After they receive the latest plugin they will show “connected” again. We recommend reviewing any build steps from the Solsta Runner plugin before executing any new build distributions.
Optional Setup via Solsta Desktop Application
The Solsta Runner Plugin allows for the creation of Products, Environments and Repositories within the Solsta deployment database as part of the Solsta Create or Solsta Deploy steps, however, those objects can also be created in the Solsta Desktop Application. Please see the articles below for how to create those objects using the Solsta Desktop Application.
- Creating Products using Solsta Desktop
- Creating Environments using Solsta Desktop
- Creating Repositories usign Solsta Desktop
Authentication
The Solsta Runner plugin provides three new Runner Types to use as build steps in TeamCity. Each runner type requires a Client ID and Client Secret from Solid State Networks. These credentials were provided when your company signed up for Solsta. Contact your company’s primary contact with Solid State Networks or open a support ticket for assistance.
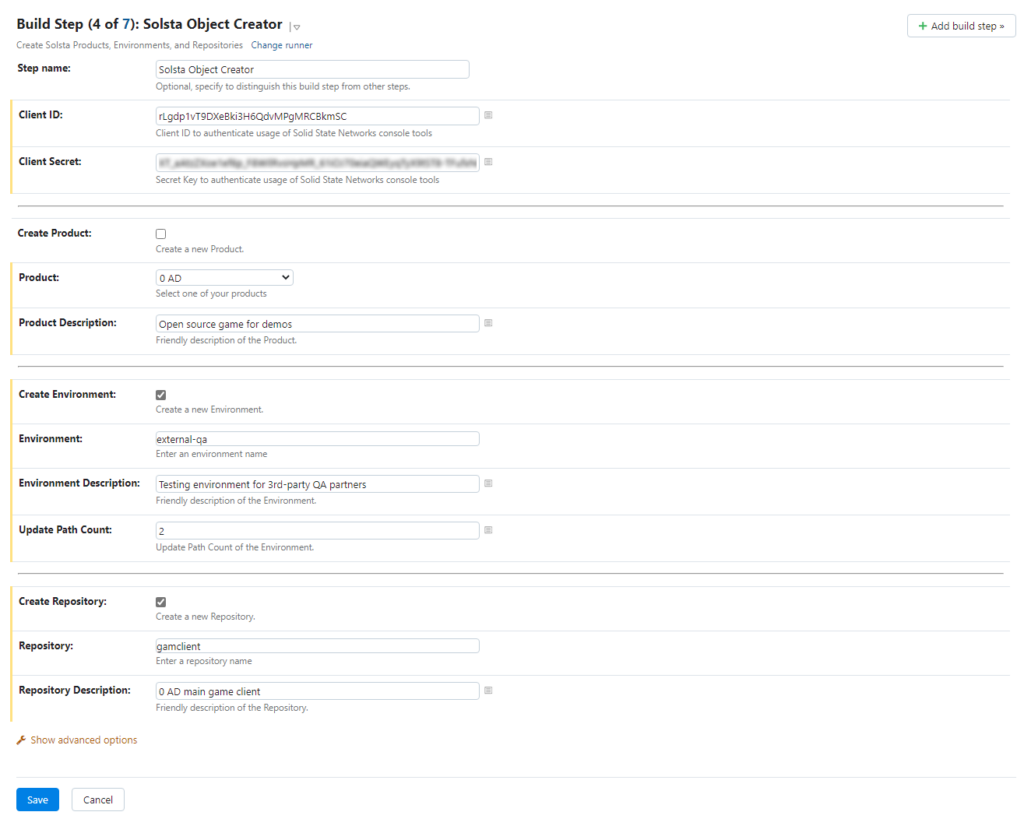
Solsta Create
The Solsta Create step creates and/or edits Products, Environments, Repositories and their properties within the Solsta ecosystem. When adding a Build Step within a TeamCity project, select Solsta Create and then fill out the following fields specified below.
Each configuration section starts with a “Create” checkbox. Checking that box converts a dropdown field to a text box. Writing a unique value in either the Product, Environment or Repository fields will result in the step creating a new object with the specified name, description and update path count value (when applicable). Using an existing name value along with updated property values will edit the existing object’s properties when the pipeline is run.
Note: The friendly names and descriptions of each object are displayed in other build steps, as well as the Solsta Desktop Application.
- Product – Friendly name for the Product. Example: LlamaGame
- Product Description – Friendly description for the Product
- Environment – Friendly name for the Environment. Example: dev-nightly
- Environment Description – Friendly description for the Environment
- Update Path Count – Number of delta update paths that are automatically created when a release is deployed or promoted to this environment. This value MUST be a zero or a positive integer. See Updates and Deltas in Solsta for more information.
- Location – the bucket or origin for the environment being created. Note that this field will only appear when an environment is being created, AND if your organization has multiple deployment buckets configured.
- Repository – Friendly name for the Repository. Example: gameclient
- Repository Description – Friendly description for the Repository
- Verbose Logging – when checked, the step will output verbose debug information during execution. When left unchecked, only status messages are printed to the output log.
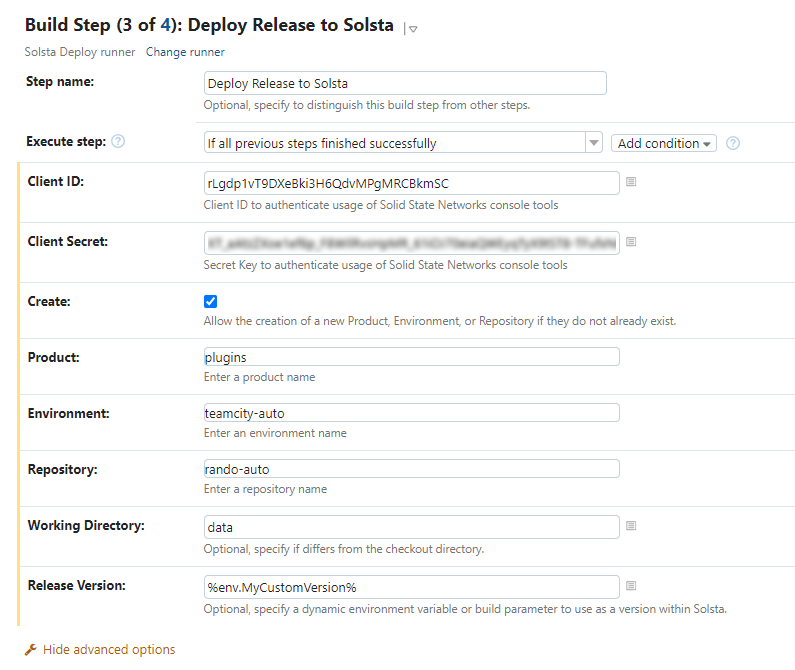
Solsta Deploy
The Solsta Deploy runner deploys (uploads) a new release to the server, bucket or CDN associated with the specified Environment. When creating a Build Step, select Solsta Deploy as the Runner type and then fill out the following fields.
Basic Deployment Options
- Create checkbox – when checked, the Product, Environment and Repository you specify in the fields below will be automatically created during deployment. When unchecked, you will be picking existing Products, Environments and Repositories using dropdown boxes.
- Product – Target product for deployment
- Environment – Target environment within containing product
- Repository – Target repository within containing environment
- Working Directory – relative path to folder within build checkout directory. The contents of the folder and its directory structure will be deployed. You can also specify a full path to the source files, provided the agent running this step has access to it.
- Release Version – Optional, specify a dynamic environment variable or build parameter to use as a friendly version number within Solsta Desktop Application (e.g. 1.0.12).
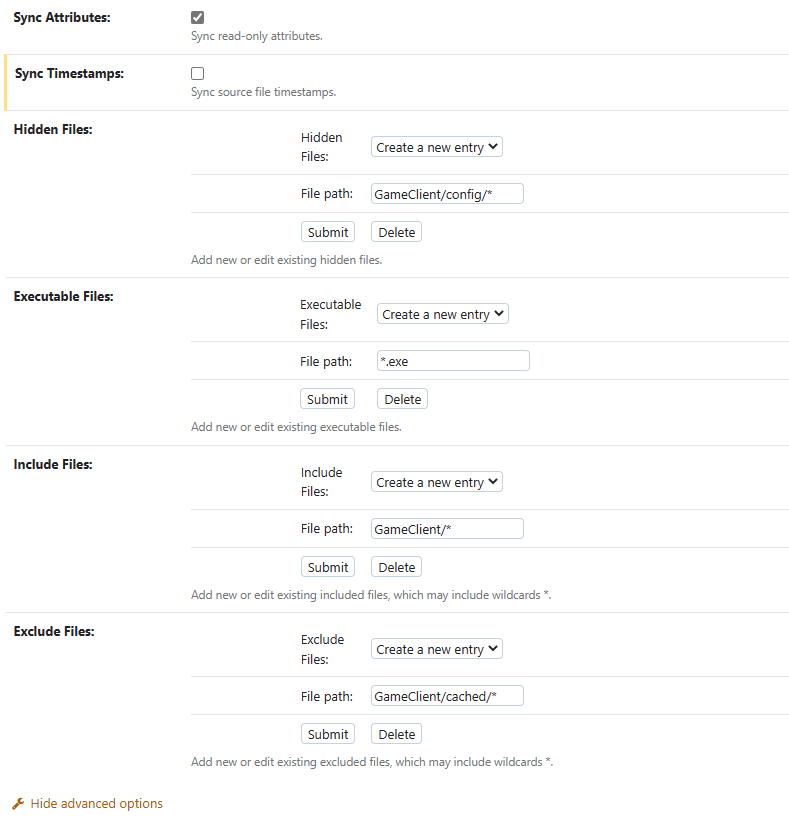
Advanced Deployment Options
After configuring your basic deployment options, you can use any of the optional fields below to further customize your deployments.
- Sync Attributes – when checked, file attributes such as “read-only” or “executable” recognized by the node/runner will be included in the deployment for the release. The Solsta Desktop Application will apply those attributes when the release is installed or updated.
- Sync Timestamps – when checked, the source files’ modified time as read by the node/runner will be included in the deployment for the release. The Solsta Desktop Application will apply those timestamps when the release is installed or updated.
- Verbose Logging – when checked, the step will output verbose debug information during execution. When left unchecked, only status messages are printed to the output log.
- Hidden Files – add an entry for each file, filetype or folder you want the “hidden” file attribute to be applied to when the Solsta Desktop Client installs or updates the release. The path to the file or folder is relative to the root of the specified source directory in the Working Directory value. Wildcards * are supported. Example values for each entry: setttings.ini; *.ini; subfolder/*
- Executable Files – add an entry for each file, filetype or folder you want the “executable” file attribute to be applied to when the Solsta Desktop Client installs or updates the release. The path to the file or folder is relative to the root of the specified source directory in the Working Directory value. Wildcards * are supported. Example values for each entry: GameClient.app/Contents/MacOS/GameClient; *.exe; libraries/*
- Included Files – add an entry for each file, filetype or folder you want to be included in the deployment. The path to the file or folder is relative to the root of the specified source directory in the Working Directory value.
- wildcard character: *
- wildcard negation character: !
- Examples: *.jpg; server-files/*;!server-files/runtime/*
- Excluded Files – add an entry for each file, filetype or folder you want to be excluded from the deployment. The path to the file or folder is relative to the root of the specified source directory in the Working Directory value.
- wildcard character: *
- wildcard negation character: !
- Examples: *.ini; configuration/*
- In case of a conflict, files in the exclude filter will override those in the in include filter
How to Manage Files from Multiple Repositories in the Same Environment
In Solsta, an environment will typically consist of multiple repositories (independent components) of your game or software product. For example, a “daily-dev” environment could consist of unique iterations of each of the following repositories:
- game client
- game server
- dev tools
- high-resolution assets
When the Solsta Dekstop Application installs this environment on machines, it will re-create the folder structure and files for each repository into a single user-specified installation directory. This means there must not be any overlap between files across repositories. If you want the client to re-create a specific sub-directory for a repository, then you must specify the proper directory when deploying releases within that repository.
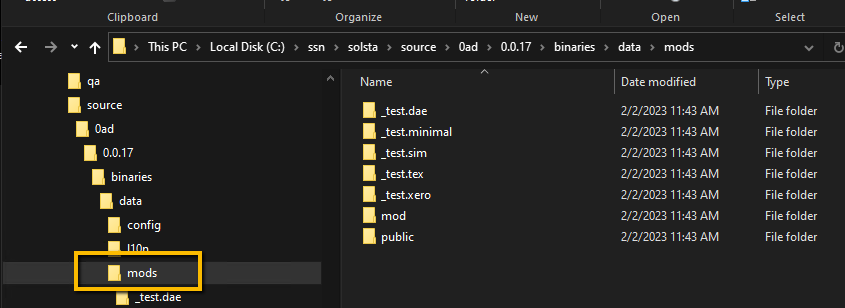
You can use the include and/or exclude filters to accomplish this, or you can specify targeted source directories for each unique repository. For example, when deploying releases to a “mods” repository, you can specify up to the /mods/ folder in the “Working Directory” field of the Solsta Deploy Step. This will make the Solsta Desktop App re-create the structure of the the /mods/ folder as seen below:
If you prefer the Solsta Desktop App to re-create a “mods” folder instead, then you will need to specify the parent directory containing “mods” when you deploy. For example:

You can go as far up your directory tree as you need during deployment to have the Solsta Desktop App re-create the folder structure for each repository. You will need to make sure files and folders specific to the repository are isolated. Options for excluding or including specific sub-directories are upcoming.
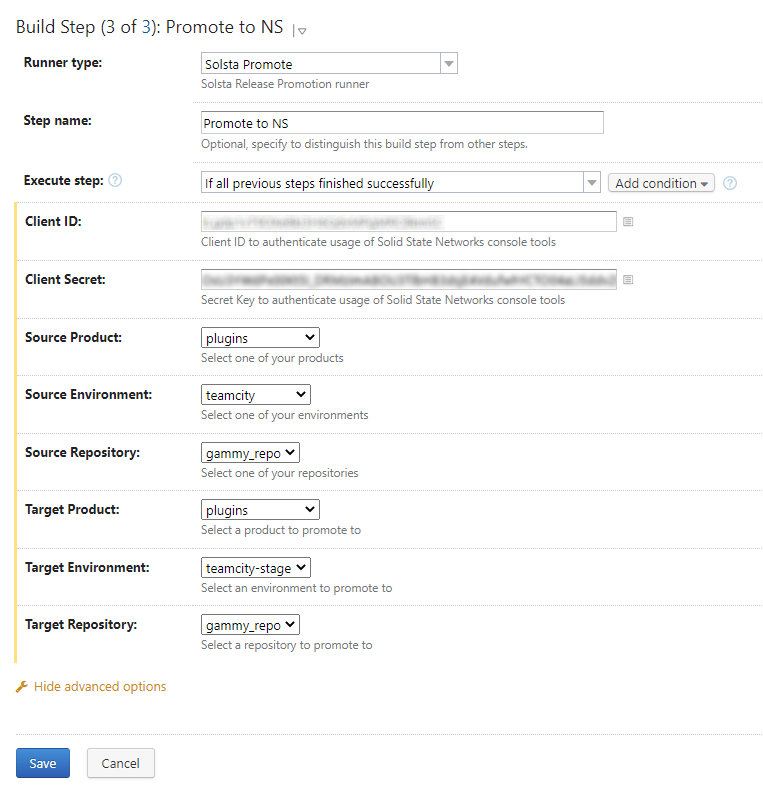
Solsta Promote
The Solsta Promote runner promotes the latest release from a source Product, Environment and Repository to a target Product, Environment and Repository. If the source and target Environments have different source location values (buckets or origin servers), the runner will automatically copy all necessary files from the source location to the target location as part of the promotion step.
Also, if the target environment has an update path count value greater than zero, the runner will automatically create delta update paths within the target Environment and Repository as part of the promotion step.
- Source Product – Source product for promotion
- Source Environment – Source environment within containing product
- Source Repository – Source repository within containing environment
- Target Product – Target product for promotion
- Target Environment – Target environment within containing product
- Target Repository – Target repository within containing environment
- Verbose Logging – when checked, the step will output verbose debug information during execution. When left unchecked, only status messages are printed to the output log.
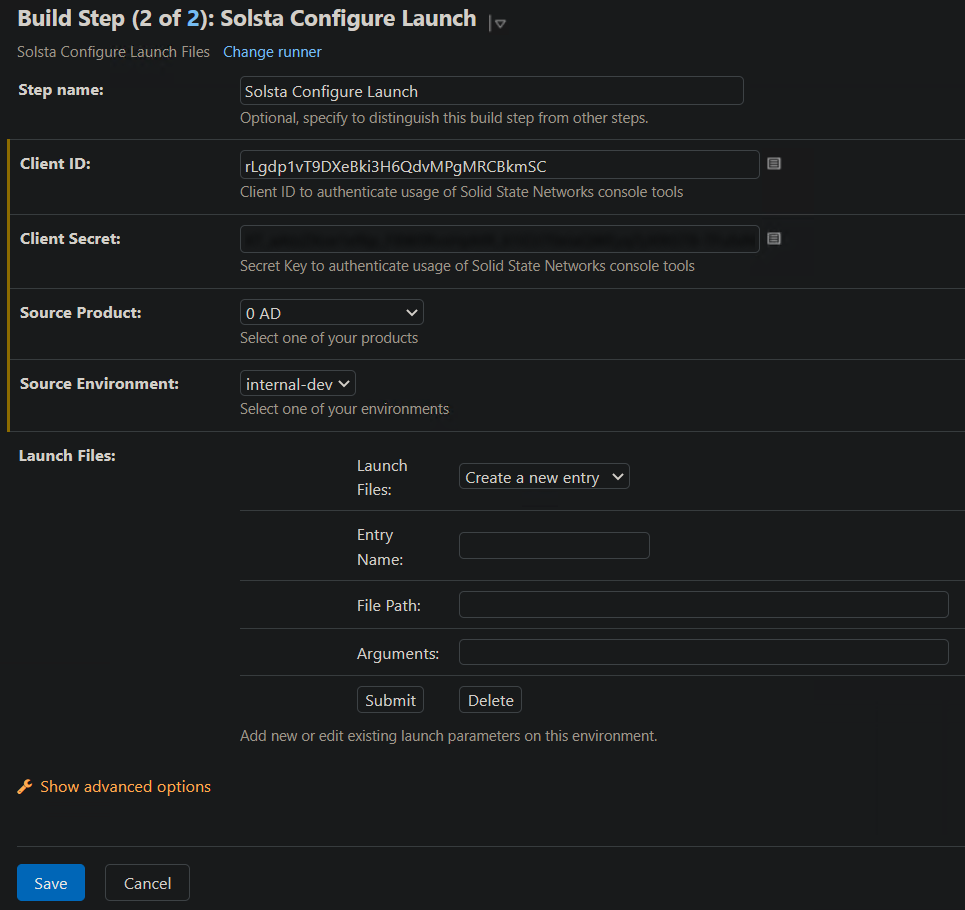
Solsta Configure Launch Files
The Solsta Configure Launch Files step manages which files are launched by the client for a specified environment. Choose values for the Product and Environment fields first, then configure multiple launch entries for that environment.
- Product – Product containing the environment to be configured
- Environment – Environment to configure Launch files for
- Launch Files – This section allows you to add, modify and remove launch entries for the selected environment. See below for step-by-step instructions.
- Verbose Logging – when checked, the step will output verbose debug information during execution. When left unchecked, only status messages are printed to the output log.
Follow the steps below to add, edit or delete launch entries for an environment. Remember to save your configuration and run the build/pipeline containing the Solsta Configure Launch Files step in order for your changes to take effect.
Related: How Launch Buttons Work in the Solsta Desktop Application
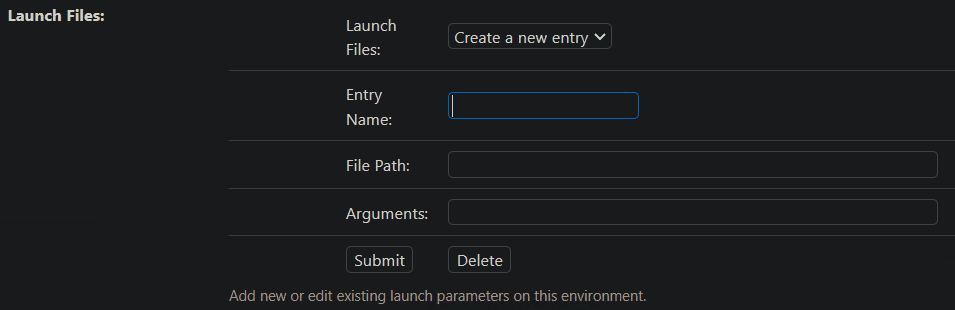
Add a Launch Entry
- Select “Create a new entry” from the Launch Files dropdown
- Type in a friendly name in the Entry Name field. This name will be displayed in the Solsta Desktop Application. Example: “Launch Game Client”
- Type in the path to the file being launched in the File Path field. Example: GameClient.exe.
- Note that if the file is in a sub-directory from the root of where the environment is installed, you will need to prepend the file path with the {installDirectory} macro. Example: {installDirectory}system/binaries/GameClient.exe
- To launch a file that is not an application directory on macOS, use /usr/bin/open as the File Path and {installDirectory}name_of_file.pkg in the Arguments field.
- Add any arguments to be used when launching the file in the Arguments field. Example: –debug –env=dev
- Click Submit. This will blank out the fields and default the Launch Files dropdown back to “Create a new entry,” however, your entry will now be available to select from the dropdown.
Edit a Launch Entry
- Select the friendly launch entry name from the Launch Files dropdown. This populates the rest of the fields with the existing values for the entry.
- Make any edits in the Entry Name, File Path or Arguments fields as necessary.
- Click Submit
Delete a Launch Entry
- Select the friendly launch entry name from the Launch Files dropdown.
- Click Delete
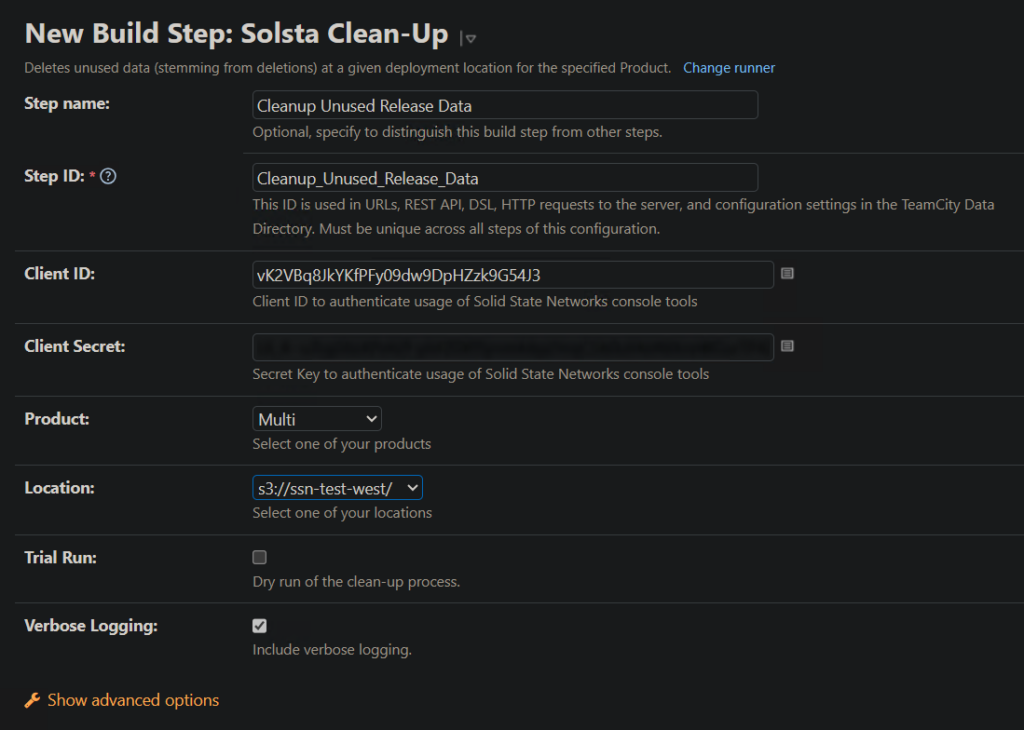
Solsta Cleanup
The Solsta Cleanup runner cleans up (deletes) old, unused release data from the origin server or bucket(s) associated with the specified Environment. Deleting releases is upcoming functionality in the Solsta Desktop Application.
- Product – Target product for cleanup
- Location – bucket or origin server to check for unused release data
- Trial Run – Checking this box performs a dry run, listing which files would be deleted without actually deleting them.
- Verbose Logging – when checked, the step will output verbose debug information during execution. When left unchecked, only status messages are printed to the output log.